iPubsoft Studio provides
Professional PDF Converter, ePub Creator and iPad/iPhone/iPod Tools
User Tutorials - How to convert JPEG to PDF?
For most users, PDF is considered as the most universal program that will permit them to view images and files easily from their computer screens. JPEG is quite common as image viewers. In some cases, we need to convert JPEG to PDF. iPubsoft JPEG to PDF Converter is just the tool for converting JPEG images into Adobe PDF format easily.
1 Import Files
Free download the trial version, which allows you to convert only 3 files. Install and run it on your computer. Then load your JPEG image files with one of 3 following methods:
1) Directly drag and drop JPEG pictures into the main interface.
2) Click "Add File" or "Add Folder" button to browse and load JPEG photos.
3) From the menu, click "File" -> "Add Files..." to locate and add your source files.
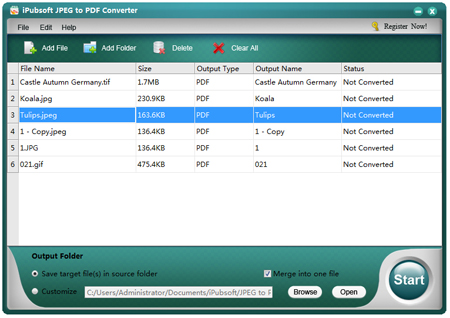
After importing files, you can see file information in the file list area, including File Name, Size, Output Type, Output Name, Status.
2 Output Settings
Set output folder: The default is saving target file(s) in source folder. You can also check the "Customize" option and click "Browse" button to select an output folder as you wish.
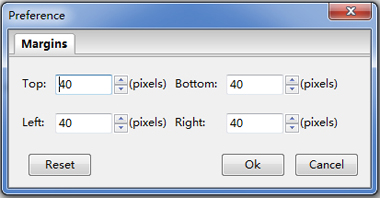
Set PDF margins: From the menu, click "Edit" > "Preference". In the pop-up dialogue box, you are allowed to set the margins: top, left, right, bottom.
3 Start Conversion
After finishing all settings, click the bottom right button: "Start", and then the conversion will begin. An orange bar will show you how much is processed. When it becomes 100%, the conversion is completed.

Important: The default is converting all imported pictures into a single PDF. After pressing "Start" button, a pop-up window will ask you for the merged PDF file's name. After conversion, a single PDF will be created. The pages are arranged according to the JPEG orders in program's screenshot. You can right click to move up or down the JPEG file.
If you don't want merging, uncheck the box of "Merge into one file". Then each JPEG file can all be converted into a PDF.
What Users Say ...
"With this smart program, I can produce PDF eBooks from image materials. All work can be done within a few clicks!"- By Paul Wilson, in Boston
"I have a number of scanned images & photos. But I need convert them into PDF format. My friend recommended this tool to me. After conversion, it is proved to be an excellent JPEG to PDF converter program!"- From Jane, in Seattle
Awards